
My daughter loves to play Minecraft and from what I’ve seen it’s quite a good game for her age (with screen time limits in mind). It’s primarily about building and problem solving (using different raw materials to make something) and if you play in creative mode, nothing can hurt you (you float instead of falling if you accidentally step off a tower you have built, you won’t be attacked by creepers and so on) though the survival mode can also be fun as it’s more challenging (as well as hostile ‘mobs’ – mobile entities- you need to find food for sustenance and so on).
You can also play within a private server which allows you control which other players have access, removing some of the risks that parents are concerned about regarding online multiplayer games.
This isn’t a description or guide to Minecraft though (and I really wouldn’t be the best person to do that as I’ve never actually played the game – it’s something my daughter does with daddy) but it’s a review of the Minecraft Live Experience in London.
I’m going to explain – what is the Minecraft Live experience and what do you do? Is it worth getting tickets to the Minecraft Live experience? And does it matter if you don’t play Minecraft and can still enjoy the Live Experience?
To answer that last question, no and yes – though as a non-player I did find a couple of parts a bit confusing and will explain below what you need to do. My daughter loved it and for a real life immersive Minecraft experience it can’t be beaten.

Where is the Minecraft Live Experience?
Canada Water in London (think Canary Wharf area if you don’t know where that is). It’s only a few minutes walk from Canada Water tube, well signposted and you can see the big green building almost straight away, with a nice riverside walk to get there.
There’s a shopping centre next door (Surrey Quays) which has parking and shops (and a soft play) if you need to kill some time, there’s also a cafe next to the Minecraft experience (you exit into here at the end but can also enter the cafe by itself) and some seating by the water which is nice on a sunny day.
What happens when you arrive at the Minecraft Live Experience?
You enter an outdoor waiting area which has toilets and lockers, and a small sheltered area by the lockers. Lockers are £3 and you are asked to use a locker for bags bigger than A4. I had a small leather rucksack which was pretty much A4 in size and was told that was fine to take in.
You can enter the experience up to 15 minutes before your time slot – we had arrived a bit earlier than this and were asked politely to come back. There are a couple of signs just inside the entrance here you can also take photos in front of.
As you go in, your tickets are scanned and you are given an orb – a small glowing square that you take around with you. You are in a group where everyone does the activities at the same time – there were 24 in our group, but you don’t have to take it in turns or worry about someone else doing the task – everyone does everything all at once (meaning it can be a little chaotic!).
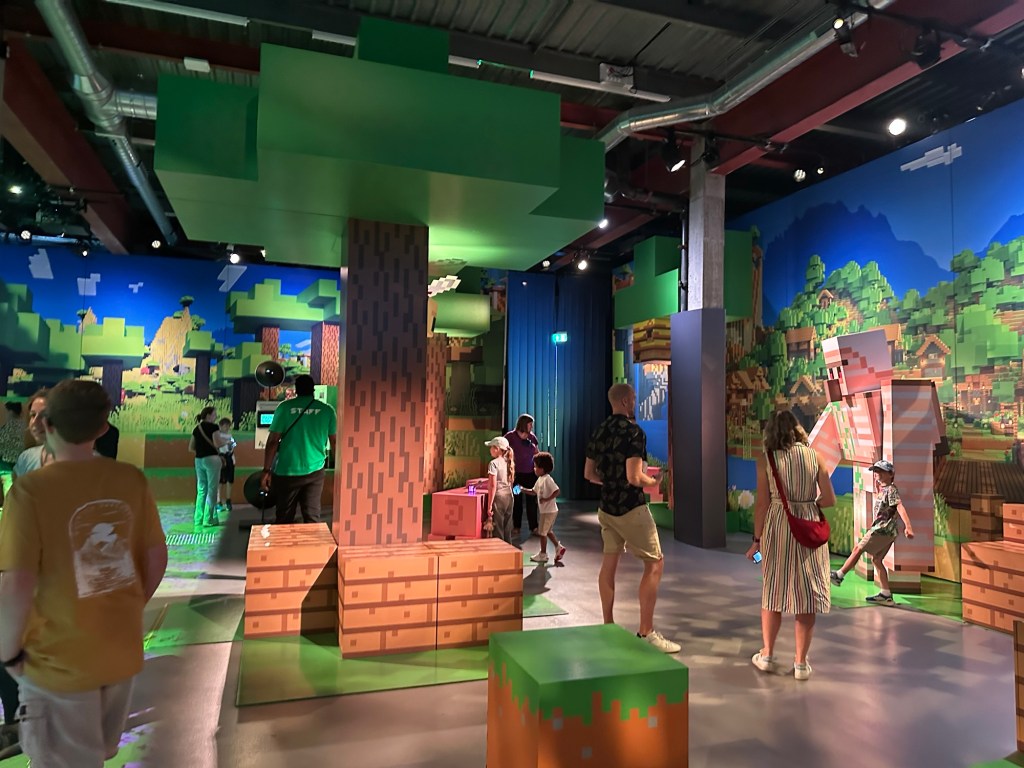
Inside Minecraft Live Experience – the forest.
First you enter the forest where you can practice using your orb to chop down trees. It’s an interactive room with digital walls where your orb allows you to do things on the screens. It may take a few tries before your orb vibrates and then you can see a pickaxe starting to chop the tree where you are making the cutting or swiping motion.
Projections appear on the floor such as apples which you stand on to collect and they disappear when you stand on them.
There are also models of Mobs around the room (the pig and chicken are cool) which you can take photos with and if you place your orb on top of them they will make a noise.
When your orb vibrates and glows green that means it’s time to move on to the next room and the group goes through all together.

In the next room we found space around a large interactive table where we had to build villages; all it seemed to involve was waiting for an X symbol to appear on your area of the table and pressing it and a building would appear; there were also hearts that appeared at regular intervals and touching those would send love to the villagers, there was also supposed to be food you could touch to feed the villagers but I didn’t see any.
I found this part a bit confusing at first as I thought we were supposed to touch the table to move interactive elements around to build but it didn’t appear to work this way and instead you just waited for the various symbols to appear and press them. We weren’t there long – each room is quite rapid so there’s no time to get bored – before the building element finished and the screens showed the villagers being attacked and taken away.

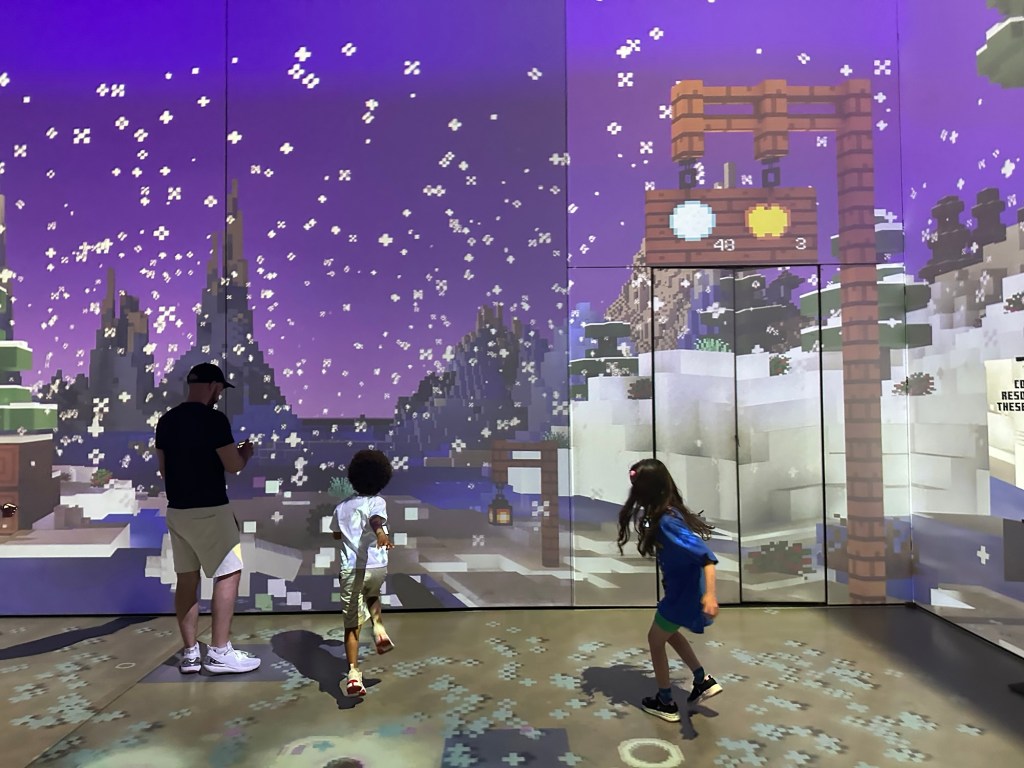
Another room involved collecting things we needed for our inventory in three different biomes – forest, snow and ocean. All four walls and the floor were interactive. You could wave your orb around to do things on the walls – in this instance I think it would help if you know Minecraft and what to look out for, eg a chest that you can open. Most of the children seemed more excited about the floor as projections rapidly appeared of apples, fish, diamonds etc depending on the biome.
It was quite chaotic with children running across each time they spotted something on the floor and in some cases not paying attention to whether they ran into people but I liked the fact there was one staff member walking around the floor pointing out inventory items and interacting with the children (I could hear lots of shouts of ‘chicken jockey’!).
Even though I don’t play Minecraft I’m familiar with the idea of crafting tables – a block that allows you to make items that you need. What I didn’t know is that the crafting table has a grid pattern showing you where to place your raw materials, eg a stick or plank of wood in the middle, iron or diamonds on either side at the top in a sort of t-shape to make a pickaxe and so on.
The live experience has a room where you need to craft various items – there are crafting tables in the middle of the room and blocks with other resources dotted around the edges. On the big screen (wall) in front of you, it tells you what to make at each crafting table and the shape – as each crafting table is divided into nine squares that your orbs fit neatly into.
The idea is to see what you need (three squares of wood, two of iron etc) and run to the block with wood, place your orb on it so it changes colour showing you have picked up a piece of wood, then place your orb in the appropriate slot on the crafting table, then go back and get another piece of wood etc. When you have all the parts needed for your item, the big screen shows that you have successfully made it and it is added to your inventory.
There was a sign on the wall as we went in saying to get into teams and each team had a crafting table, which I think would have worked well, as each team member could go and get the various resources, but what actually happened was it was more of a free for all, with players jumping about between different crafting tables and working in their family groups rather than getting into teams per crafting table.
That meant that you could start on a crafting table and see you needed wood, go off to get the wood, and by the time you came back someone else would have completed your item and the table will have moved on to show the next item you needed to make, which meant your wood was now not needed and you had to go off and get something else… and by the time you came back it would have changed again. I think we only successfully managed to craft one item though it also took me a minute to understand why it was going wrong each time and what we were actually supposed to be doing! My daughter enjoyed the atmosphere and running back and forth to collect things and didn’t seem to mind too much that we weren’t successfully crafting.
Any Minecrafter knows that to get to the nether you need to make a portal from obsidian .. our host got the children involved by asking them what they needed to make obsidian (lava and water) and which order you need to combine them in as it won’t work if you get it wrong. So of course our task was to make obsidian!
I took a minute to realise what we were meant to be doing so even though it’s probably quite obvious to some, I’ll explain here just in case! Head to the hot lava source and place your orb on top so it glows red, then go to one of the large buckets and if it is white, place your red orb (lava) on top, at which point the bucket changes colour to red. Then go to the water source on the other side of the room, place your orb on it so it turns blue, and go back to the red bucket (full of lava) and place your blue orb (water) on top and it will make obsidian, turning your orb purple. Then go over to the portal (the door frame) and touch it with your orb to pass on the obsidian, and repeat the process again.
Where you need to pay attention is if after getting your lava and turning your bucket red, you could come back to it and find someone else has turned it blue. You don’t want to add lava to water – it has to be the other way around – and if you do, your orb loses its colour and you have to start again and go and get more lava. So you need to wait until the bucket is either white or already red, to add your lava, and then only add your water to a bucket that is red. You with me? It’s quite easy when explained like that, but trust me, quite a few people were getting it wrong!

Once you have made the portal you can enter the nether! This room was quite fun, as we had to throw snowballs (soft white balls) at a screen to kill zombies, scooping them up to throw again as fast as we could. It was tiring but fun.
When we had won the battle we went into the last room which featured potion bottles and a short animation sequence; something to do with making a potion for the villagers who had been turned into zombies at the start (oh yes, I forgot this had happened) and celebrating our victory and villager rescue.
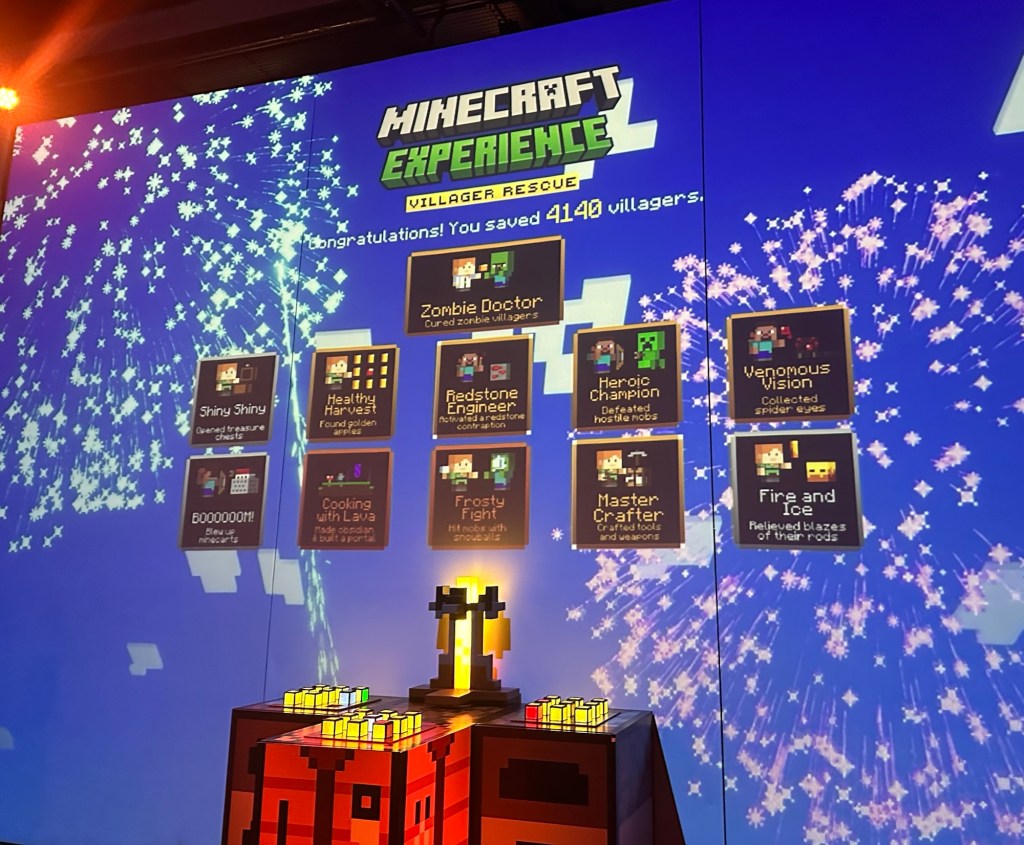
The whole thing only took about 45 minutes and was fast paced and frantic, leaving me not entirely sure what was going on at times, but I think a large part of that was due to being a non-gamer and Minecraft noob (newbie), whereas my daughter who is a little Minecraft obsessed seemed to know exactly what she was doing and she loved the whole experience.
From the story to the life size character models and the many, many interactive elements and fairly chaotic pace, my daughter thought this was a fantastic experience and I did think it was well done overall even though it was quite expensive.
On our way out we were each given a code for an exclusive in-game cape; you exit through a cafe (which had some green decor but didn’t seem to be Minecraft themed) and thankfully while there is a gift shop you don’t have to go through it to exit. We did look in the gift shop and while I think I remember there were a few ‘Minecraft experience’ branded small items, most things you can buy in other shops at a significantly lower price.
Overall it was a good experience and unique – my daughter was thrilled to do a ‘real life’ Minecraft mission and I would recommend it for any fans.

Leave a comment